How To Replace a Patio Sliding Door
Replacing a patio sliding door can significantly enhance a home’s aesthetics, energy efficiency, and security. This project, while achievable for experienced DIY enthusiasts, requires careful planning, precise execution, and adherence to safety guidelines. Proper installation ensures a weathertight seal, smooth operation, and prolonged lifespan of the new sliding door. This article provides a comprehensive guide to the process, outlining the necessary steps from preparation to the final installation.
Before embarking on this project, accurately assess personal skills and comfort levels. While the cost savings of DIY installation can be attractive, improper installation can lead to costly repairs and compromised performance. If uncertain, consulting with a qualified professional is always recommended.
The following sections detail the key aspects of replacing a patio sliding door, providing a structured approach to ensure a successful outcome.
### Preparation and PlanningThorough preparation is paramount to a smooth and efficient door replacement process. This stage involves accurately measuring the existing door, selecting a suitable replacement, gathering necessary tools and materials, and preparing the work area. Neglecting these steps can lead to delays, errors, and increased project complexity.
Measuring the Existing Door: Precise measurements are essential for ordering a properly sized replacement. Measure the door opening’s width and height at multiple points to account for any inconsistencies. Measure from the interior frame edges to ensure accuracy. Note the thickness of the existing door frame. These dimensions will serve as the basis for selecting a new door that fits snugly within the existing opening. Pay attention to the track depth, as variations can impact compatibility if reusing existing tracks.
Selecting a Replacement Door: Patio sliding doors are available in various materials, including vinyl, aluminum, wood, and fiberglass. Each material offers distinct advantages in terms of durability, insulation, maintenance requirements, and aesthetics. Vinyl doors are popular for their energy efficiency and low maintenance. Aluminum doors are lightweight and corrosion-resistant. Wood doors offer a classic look but require regular maintenance. Fiberglass doors are known for their strength, durability, and resistance to warping and rotting. Consider the home's architectural style, budget, and climate when selecting a replacement door. Also factor in the door’s energy efficiency rating (U-factor and Solar Heat Gain Coefficient) for optimal thermal performance. Determine the desired features, such as double-pane glass, low-emissivity coatings, and security locks. Compare prices and warranties from different manufacturers before making a final decision.
Gathering Tools and Materials: The following tools and materials are typically required for patio sliding door replacement: safety glasses, work gloves, a utility knife, a pry bar, a hammer, a screwdriver (both flathead and Phillips), a level, a measuring tape, a drill with various drill bits, shims, sealant (exterior-grade silicone or polyurethane), caulk gun, construction adhesive, and possibly a reciprocating saw if modifications to the opening are needed. Having all necessary tools readily available will streamline the installation process.
Preparing the Work Area: Clear the area around the door, both inside and outside. Remove any furniture, window treatments, or other obstacles that might impede access. Cover the floor with drop cloths or protective sheeting to prevent damage from debris and tools. Ensure adequate lighting to facilitate clear visibility throughout the project. Protect surrounding landscaping from potential damage during door removal and installation.
### Removing the Old Sliding DoorCareful removal of the old sliding door is crucial to avoid damaging the surrounding structure and to prepare the opening for the new door. This process involves disconnecting any security systems, removing the sliding panel(s), dismantling the frame, and cleaning the opening. Rushing this step can lead to complications and potential structural damage.
Disconnecting Security Systems: If the old sliding door is equipped with a security system, disconnect it before proceeding with the removal. Consult the security system's manual for instructions on how to disable the sensor or contact the security company for assistance. Failure to disconnect the system can trigger false alarms and potential damage to the security equipment.
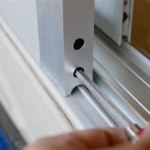
Removing the Sliding Panel(s): To remove the sliding panel, lift it slightly and pull the bottom towards you to disengage it from the track. Depending on the door's design, it might be necessary to adjust rollers or release locking mechanisms. Once the bottom is free, carefully lift the panel out of the frame. If the door is heavy, enlist assistance to prevent injury. Repeat this process for any remaining sliding panels. Store the removed panels in a safe location to avoid damage.
Dismantling the Frame: Use a utility knife to cut through any caulk or sealant along the inside and outside of the existing door frame. Remove any screws or nails securing the frame to the opening. Use a pry bar to carefully separate the frame from the surrounding wall, working from the inside out. Be cautious not to damage the drywall or siding. If the frame is particularly stubborn, consider using a reciprocating saw to cut it into smaller sections for easier removal. Wear safety glasses to protect your eyes from flying debris. Once the frame is removed, inspect the opening for any signs of rot or damage. Repair any necessary structural issues before proceeding.
Cleaning the Opening: Thoroughly clean the door opening, removing any old caulk, sealant, nails, or debris. Use a scraper or wire brush to remove stubborn residue. Ensure the opening is level and square. Use shims to correct any minor imperfections or irregularities. A clean and level opening is essential for proper installation of the new sliding door.
### Installing the New Sliding DoorThe installation phase requires precision and attention to detail to ensure a weathertight seal, smooth operation, and structural integrity. This involves positioning the new frame, squaring and leveling it, securing it to the opening, installing the sliding panel(s), and sealing the perimeter.
Positioning the New Frame: Carefully lift the new door frame into the prepared opening. Ensure it is oriented correctly, with the sliding track facing inward. If the door frame is heavy, enlist assistance to prevent injury. Center the frame within the opening, leaving equal spacing on all sides. Verify that the frame sits flush against the surrounding wall. If necessary, use shims to adjust the frame's position and ensure proper alignment.
Squaring and Leveling the Frame: Use a level to check the frame's vertical and horizontal alignment. Adjust the shims as needed to ensure the frame is perfectly square and level. An out-of-square or unlevel frame can cause the door to bind, leak, or fail to operate smoothly. Use a combination square to verify that the corners of the frame are at 90-degree angles. Once the frame is properly aligned, temporarily secure it in place with screws or nails.
Securing the Frame to the Opening: Drill pilot holes through the frame and into the surrounding wall studs. Use screws of appropriate length to securely fasten the frame to the opening. Ensure the screws are driven straight and flush with the frame's surface. Avoid overtightening the screws, as this can distort the frame and compromise its alignment. Check the frame's alignment again after securing it to the opening, making any necessary adjustments. If the frame is not properly secured, it can shift over time, leading to leaks and operational issues.
Installing the Sliding Panel(s): Carefully lift the sliding panel(s) into the track, following the manufacturer's instructions. Ensure the rollers are properly aligned with the track. Adjust the rollers as needed to ensure smooth and effortless operation. Check the panel's alignment and adjust the leveling screws to achieve a consistent gap between the panel and the frame. Test the door's operation by sliding it open and closed several times. Make any necessary adjustments to the rollers or track to eliminate any binding or friction. If the door is equipped with a locking mechanism, test it to ensure it functions properly.
Sealing the Perimeter: Apply a bead of exterior-grade sealant (silicone or polyurethane) around the perimeter of the door frame, where it meets the surrounding wall. Ensure the sealant completely fills any gaps or cracks. Smooth the sealant with a finger or a damp cloth to create a clean and professional finish. Allow the sealant to cure completely before exposing the door to moisture. Apply construction adhesive to any remaining gaps between the frame and the wall before applying trim.

Replacing Patio Doors With French

Install A Sliding Door How To Easily Remove An Old And New One

How To Replace A Sliding Glass Door With French Doors

How To Replace A Patio Door Diy Family Handyman

How To Remove And Install A Patio Door Quick Easy Step By Tutorial

How To Remove Patio Sliding Door On Vinyl Siding Install Reliabilt From Lowes

How To Replace A Patio Door Diy Family Handyman

How To Replace A Sliding Glass Door With French Doors

How To Install A Sliding Glass Patio Door Step By

How To Replace A Patio Sliding Glass Door Roller 1080p Youtube