How To Lay Cement Patio
Laying a cement patio is a great way to add value to your home and create a beautiful outdoor space. While it may seem like a daunting task, it's actually quite straightforward with the right planning and execution. Here's a step-by-step guide to help you lay a cement patio:
Step 1: Planning and Preparation
Before you start laying the cement, it's important to plan and prepare the area where the patio will be located. This includes clearing the area of any debris, vegetation, or obstacles. You'll also need to determine the size and shape of the patio and mark it out using stakes and string.
Step 2: Excavation
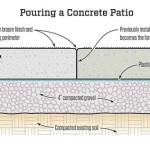
Once the area is prepared, you'll need to excavate the site to a depth of at least 4 inches. The excavated area should be level and free of any rocks or debris. If the soil is very loose or sandy, you may need to add a layer of gravel or crushed stone to provide a stable base.
Step 3: Formwork
The next step is to build the formwork around the perimeter of the excavated area. The formwork will serve as a mold for the cement and will help to ensure that the patio is level and has straight edges. You can use lumber, metal, or plastic to build the formwork.
Step 4: Reinforcing the Patio
To make the patio more durable, it's important to add reinforcement before pouring the cement. This can be done by placing a layer of reinforcing mesh or rebar over the excavated area. The reinforcement will help to prevent the concrete from cracking or shifting over time.
Step 5: Pouring the Concrete
Now it's time to pour the cement. You can either mix the cement yourself or order it premixed from a concrete supplier. If you're mixing the cement yourself, be sure to follow the manufacturer's instructions carefully. When pouring the cement, use a wheelbarrow or concrete pump to spread it evenly over the reinforced area.
Step 6: Leveling the Concrete
Once the cement has been poured, it's important to level it using a screed or straight edge. A screed is a long, flat tool with a straight edge that is used to smooth and level the surface of the cement. After screeding, use a trowel to smooth the surface of the cement and remove any excess water.
Step 7: Finishing the Patio
Once the cement has set, you can apply a finish to the patio. There are a variety of different finishes available, including broom finishes, stamped finishes, and exposed aggregate finishes. The type of finish you choose will depend on your personal preference and the intended use of the patio.
Step 8: Curing the Patio
The final step is to cure the cement patio. This involves keeping the cement moist for several days to allow it to properly harden. You can do this by covering the patio with plastic sheeting or burlap and keeping it damp with water. After a week or two, the cement should be fully cured and ready to use.
Additional Tips
Here are a few additional tips for laying a cement patio:
- Use a high-quality concrete mix.
- Make sure the concrete is properly mixed and placed.
- Allow the concrete to properly cure.
- Seal the concrete patio to protect it from the elements.
- Enjoy your new cement patio!

Diy Concrete Patio In 8 Easy Steps How To Pour A Cement Slab

Pouring Concrete Patio What Could Go Wrong With Doing It Yourself

How To Build And Lay A Patio Marshalls

Diy Concrete Patio How To Pour A Slab Bob Vila

How To Pour A Concrete Patio With Pictures Wikihow

Quikrete Building A Concrete Patio

How To Plan Pour Your Diy Concrete Patio Liberty Ready Mix

Diy Concrete Patio How To Pour Your Own Slab Bn Products

How To Prepare A Site For Concrete Base Forms And Rebar

How To Lay A Patio On Concrete Or Over Paving Marshalls


